Trim Molding
Electrical Wiring
Building & Remodeling
Wall Repair
House Painting
Cleaning & Repair
DIY Videos
Get Help With Your Next DIY Project!
How to Prep Wood for Painting
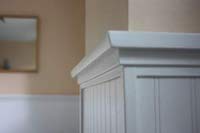 If you need to paint wood trim molding around walls and ceilings, taking time to prepare the surface properly will reward you with a beautiful, durable finish for years to come. Whether your trim is bare wood or it has been painted before, you will need to be sure the surface is smooth and all holes and gaps are filled before the finish enamel is applied. This page contains steps and techniques for preparing bare and previously painted interior wood trim molding for painting. Read More
How to Frame a Partition Wall
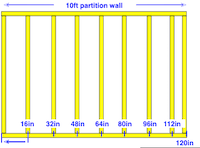 According to the International Residential Code the spacing of the studs in any particular wall will vary depending on whether it is load-bearing or not, its height, and the size of the lumber used. Studs in a non-load-bearing wall may be up to 24 inches apart for 2x4's, and up to 16 inches for 2x3's. This means that the studs are set 16 inches apart along the two plates, with the center of each stud placed at each 16 inch mark. The required 24 and 16 inch spacing provides the necessary support for the wall and this arrangement makes it convenient to install four foot panels of building materials like drywall, paneling, and plywood. Read More
How to Do Sponge Painting
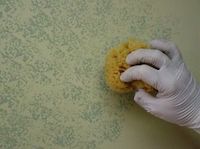 Sponge painting is one of the easiest faux finishes to do for beginners and ranges from the ultra-simple to the fairly complex. These effects can be used to decorate walls, furniture, or just about any paint-able surface and they are particularly well suited for hiding rough wall surfaces. There are basically two different techniques that can be used to create these effects: positive sponging and negative sponging. Positive sponging involves applying glaze, a little at a time, using a sponge to dab the color onto the surface. There are degrees of positive sponging, using just one application of glaze for a transparent effect that allows much of the base color to show through, and using multiple patterns, one over the other, to create an opaque effect that virtually covers the underlying color. Read More
How to Clean Carpets and Rugs
 If your carpet needs a major cleaning and you want to do it yourself, you have two basic methods to choose from. You can use a cleaning product that is applied and then vacuumed up using your household vacuum cleaner, or you can get a specialized machine that will apply the cleaner and vacuum it up, or extract it, at the same time. Carpet cleaning products used with your vacuum cleaner are readily available at supermarkets and home stores. These can include liquids and foams that are sprayed onto the carpet and powders that are sprinkled on. Powders are by far the easiest to use, but may not penetrate down to the base of the pile as well or clean as well as foams and liquids. Foams and liquids can be messy to use and the carpet will take some time, usually overnight, to dry completely before the room can be used again. There's also the concern that too much liquid is left behind because the vacuum doesn't extract it effectively. This can result in mildew growth in the still-wet carpet backing, padding or floor causing lingering odors in the room or possible damage to the floor. Read More
How to Repair a Window Sash Cord
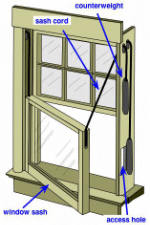 This diagram illustrates the anatomy of a double-hung window and the pulley/weight system used to raise and lower the sashes. All these types of windows work in the same way, a cast iron weight is attached with a cord to both sides of each sash. The cord runs up to the top of the window jamb, through a pulley channel, and down to the weight inside the jamb. As the sash moves up and down the counterweight keeps it balanced and held in place. To repair the cord on a window like this, the counterweight inside must be reattached to the sash with a new cord. This would be a simple task if not for the need to open the jamb to get to the cast iron weight inside. Fortunately most old, double-hung wooden windows have an access panel cut into the lower sash channel for this very purpose. Start the repair by removing the stop bead on one side of the window casing. Hold a broad chisel with the flat toward the jamb and drive it behind the bead at regular intervals to loosen the nails and pry it off. Remove the stop bead completely and pull the nails out. Set it aside. Read More
Install Framing for a New Ceiling Fan
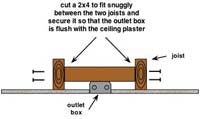 Working in the unfinished attic space above the new fixture location, measure the distance between the two nearest ceiling joists. Cut a 2x4 to this length and attach a new, fan-rated outlet box to the midpoint using deck screws. If no access is available from above you can work through the outlet hole to install a specially made, adjustable fan support. Using this method, it can be difficult to secure the support and set the outlet box at the proper finished level. An easier way to be sure of proper placement is to use the method here to install a wood frame. The ceiling must be cut to do this, after which the damage can be patched and/or covered with a decorative medallion. Read More
How to Install Drywall Corner Bead
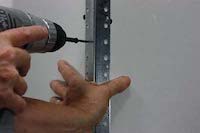 Outside drywall corners can be finished with either metal or paper bead but metal is the easiest to install and by far the best choice for durability and professional results. Drywall sheets usually don't come together perfectly at the corners, a metal bead forms its own corner to cover any irregularity in the union. Paper corner bead can't do that and the finish may appear wavy and irregular when finished. For a durable finish use setting-type joint compound, also called mud, for the first coat over the metal. Ready-mixed compound can be used for the second and finish coats but it's too soft and prone to shrinking when used in a thick application like that required to cover metal corner bead. Work quickly when using setting compound to be sure it doesn't harden before you're done. Read More
How to Repair Large Drywall Holes
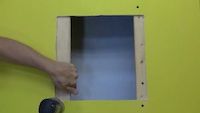 This method will work to fix large holes of a foot or more in drywall ceilings and walls and requires the use of added wood framing to hold the new patch in place. Use a drywall saw to cut from inside the hole, out to each corner of the square. Cut a bit past the pencil mark at each corner to be sure the new drywall patch will fit easily without forcing. Score the pencil lines around the hole with a sharp utility knife. Cut just a bit outside the lines to keep the squared hole large enough for the new patch to fit easily. Snap off the sides of the damaged wallboard, pushing into the hole along the score lines. Cut through to the backing paper and remove the damaged pieces along each side of the squared hole. Read More
 Repair Torn Drywall Paper
 Trim Molding Ideas
 Three Coat Plaster Repair
 Trim Molding Profile Examples
 Wood Joinery Techniques