How to Build a Picket Fence
by: Dale Cox

If you want a traditional picket fence design around your yard or garden, you'll probably have to make it yourself. Picket fences with a gothic design are everywhere these days. In fact, it's difficult to find anything other than this overly elaborate design at home stores and lumberyards. The gothic design for picket fences became popular in the past 20 years or so and this obsession has not abated.
Fortunately, it's very easy and economical to build a traditional picket fence from scratch, yourself. The only special tool needed is a jigsaw to cut the tops of each picket. It will take some time and you will need somewhere with sufficient space to assemble the fence sections but it's well worth the effort if you just can't abide the sameness or overly elaborate design of gothic style pickets.
#1 - Plan the Fence
This fence design requires 11 1x3 furring strips per 8 foot section. Two for the rails between the posts, and 9 strips cut in half to make 18 pickets per section. At an average price of $1.60 each for furring strips, that's about $18.00 for each fence section. You'll also need extra pickets to cover the corners and the union between each section. In addition, if you plan to have a gate, you'll need more furring strips for that, plus hinges and a latch. Finally, you'll need 4x4 posts and stain or paint to finish the wood.

To plan the fence, calculate how many 8 foot sections you'll need. Because the furring strips typically only come in 8 foot lengths, your fence sections will have to be this wide too. The height of the fence can vary but with 8 foot boards cut in two to make pickets, the most you can get is about 4 feet. Also, consider any gates you want to add. A gate in a picket fence should be about 3 or 4 feet wide.
One note: you can make fence sections longer than 8 feet if you really need to. It requires a bit more work though. You'll have to rip a 1x6 board down the middle to produce two strips about the same size as the 1x3 rails used in the rest of the fence. Because you can get 1x6's in lengths longer than 8 feet, you can use one to make a fence section just about any length you need, you'll just have to add more pickets to fill the extra space.
Decide where you want to put a gateway in the fence and if you want more than one. A picket fence gate width of 3.5ft will provide adequate room for foot traffic and allow for lawnmowers and wheelbarrows to pass through as well. It will require six, 8ft furring strips to make a gate this width so add that to your materials list for each gate you plan to include.
#2 - Cut the Pickets

Choose the straightest boards you can find at the lumberyard. If the boards are bowed or warped, the finished fence will be disappointing with crooked pickets and rails. To make things easier, paint or stain all the boards and let them dry completely before you begin cutting.
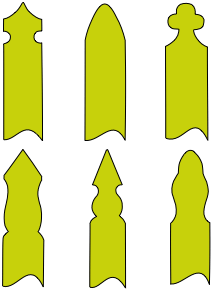
It's best to cut all the pickets you'll need at the same time. Decide on the height you want for your picket fence and cut all the 1x3's to length. Next, cut the profile in the tops of the pickets. A blunted point profile is used in this design but you can vary this to a rounded top or one of the more elaborate designs illustrated here.
Cut a template of the profile you've chosen using a short piece of 1x3. Lay the template over the end of each picket and trace the outline with a pencil. Use a jigsaw to cut out the design. When all the pickets are cut, stack several together at a time and paint or stain the bare wood exposed by the cutting process. Let the pickets dry before you start the fence assembly.
To make assembly easier, it's best to use a pneumatic nailer to attach the pickets to the rails. This method fastens the wood together and sinks the nail heads with one quick snap that prevents the boards from moving out of alignment during the process. Use 1.25 inch brads or staples to join the 1by fence boards so the fasteners won't protrude from the back. To prevent rusting that can stain the fence boards, choose galvanized fasteners.
#3 - Build the Fence Sections
Lay out the rail boards and space them the proper distance from top to bottom. Our fence rails are spaced at 32 inches and our pickets are 46 inches long, leaving 3 inches overlapping at the bottom and 6 inches overlapping at the top. You can vary this spacing but keep in mind for visual appeal, the picket overlap shouldn't be too extreme.

To keep the rails from moving while you work, cut scrap boards to the proper length and clamp them at each end as temporary spacers. Also clamp a board along the top with two spacers to set picket height.
Set a picket at each end of the rails so they are 1.5 times the picket width back from the rail ends. Here that would be 3.75 inches. Fasten these first two pickets to the rails and then add the center pickets, one by one.

Use two small pieces of scrap wood the same width as the pickets to space them across the rails. As you reach the end, with just one or two more pickets to install, check the spacing to be sure you don't end up with a wider gap than the rest between the last two. Vary the placement of the last couple of pickets to divide the remaining space evenly if necessary.
#4 - Set the Posts and Install the Fence Sections

Set your fence posts using the methods described in our building a fence tutorial so the tops will be a bit lower than the tops of the pickets. Set the bottom of the pickets so they are a few inches off the ground. The distance is a matter of taste but keep in mind the post height and any changes in ground elevation when choosing how high to set the fence sections. Attach the picket sections butting the rails snuggly together at each post.

After the sections are all installed, go back and cover the gaps at each post and at the corners with a single picket to finish the installation. Use a scrap piece of board laid across the adjacent pickets to set the height at the gap.
#5 - Build and Install the Gate

After the fence sections are installed, the gates can go in. To build a 3.5ft picket fence gate, cut one 8ft furring strip to get two rails. Make the rails one inch shorter than the gate opening. For a 3.5ft opening, that would be 41 inches. Install the first two pickets flush with the ends of the rails and set them using the same spacer boards you used to construct the fence sections so they line up nicely when the gate is installed.

Install the remaining pickets using the same method used to build the sections, one at a time and set with a 1x3 spacer between them and a board along the top to keep them properly aligned. Before fastening the pickets to the rails, lay them all in place to be sure they are evenly spaced and adjust placement if the final space is not equal.

With all the pickets installed, set a framing square on the two outer pickets to square up the rails. Clamp the gate assembly down to keep it square and then lay a board diagonally across the rails to mark it for cutting. This board will form a "Z" pattern across the back of the gate and keep it square so it fits and functions well in the gate opening. Cut the Z-board to length, check the fit and clamp it to the pickets to hold it in place. From the front of the gate, fasten each picket to the "Z" where they overlap to construct a sturdy, durable gate.

Attach T-strap hinges to the rails and install the gate so it opens into the fenced area. Line up the gate rails with the fence rails so everything looks neat and square. After the gate is hung, install single pickets to cover the posts and provide a place to install a gate latch on the outside of the fenced area.
 Building a Backyard Arbor