Adding Electrical Wiring Behind Baseboards
by: Dale Cox
Check permit requirements before beginning electrical work.
How to read these diagrams.
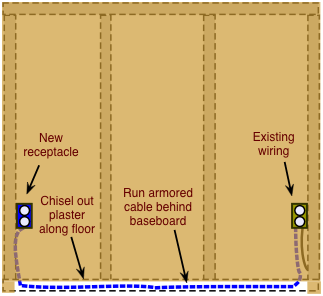
If permitted, new electrical wiring may sometimes be run behind baseboards to serve a new wall receptacle or a new switch and ceiling fixture. There are a couple ways of doing this. As pictured in this diagram, armored cable may be run along the base of a plaster wall and then covered with the baseboard.
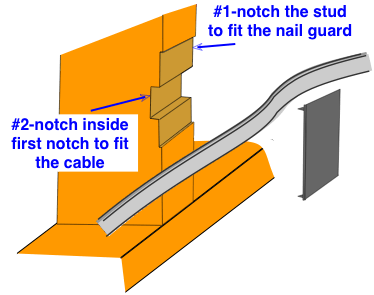
Another method for drywall, described on this page, involves running wiring behind the baseboard by passing it through the wall studs. With this approach, the wood is notched just enough to pass a new electrical cable and a metal shield, called a nail guard, is then fastened over the notch to protect the new wires from nail and screw punctures. The drywall and baseboard are then reinstalled to cover the installation.

What You'll Need
- Hammer
- Pry Bar
- Chisel-type Drywall Knife
- Handsaw
- Chisel
- Utility Knife
- Drywall Saw
- Caulk and Caulk Gun
- Nail Guards
- Electrical Cable
#1- Remove the Baseboard

First, plan the path for the new wiring and remove the baseboards where necessary. Use a sharp utility knife to cut the caulk and paint sealing the top of the baseboard to the wall. Use a straight edge held flat against the top of the base cap to keep your line straight as you pull the knife through the caulk several times until it's cut cleanly.
Pry the molding off the wall working at each stud. Drive a broad chisel-type joint knife between the baseboard and wall. Pull out on the handle several times to loosen the molding enough to wedge a crowbar behind it. Hold a piece of plywood against the wallboard at each stud and press the crowbar against it to pry the molding off. If you have two-piece baseboards, remove one piece at a time starting with the base cap and then remove the wider parts. Scrape the old caulk off the wall and molding using a putty knife and remove the old nails. Sand the wood lightly with 120 sandpaper and put it aside to reinstall later.
#2- Mark and Cut the Wall

Mark a straight line along the wallboard, a few inches from the floor, just below the top of the baseboard. Cut the wallboard along this line using a drywall saw for the hollow parts between the studs and a utility knife to cut over the studs. Try to remove the wallboard cleanly so it can be reattached when you're done. The baseboard can be reinstalled without replacing the wallboard but this will create easy access for pest such as rodents, as well as drafts from cold air during the winter so it's best to put it back when you're done.
#3- Notch the Studs

Mark each stud for notching using one of the nail guards as a template. Use a handsaw to cut to the depth of the plate thickness along the top and bottom lines. Use a wood chisel to chip out between the two cuts. Chip deep enough to fit the plate flush with the stud surface. Keeping the plates flush with the wood will ensure the baseboard won't stick out when reinstalled.
In the center of each plate notch, cut a second notch about ¾ inch wide to fit the new cable. Make the depth about ½ inch to accept the cable thickness but by code you need to keep the entire notch depth to a maximum of ⅞ inch for load-bearing 2x4 studs, and 1-½ inches for non-load-bearing studs.
#4- Run the Cable

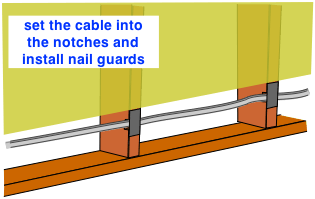
Run the new cable from the source electrical box, through the notches, and into the new outlet box. Pull an extra 8-10 inches of cable into each outlet box to allow for stripping and connecting the wires. Fit a nail guard into each notch, covering the new cable. Drive the plates down tightly making sure they are flush and not protruding from the stud surface.
#5- Reinstall the Baseboard

Reinstall the wallboard strip. First, trim along the edges with a sharp utility knife to remove any torn paper that could created a bulge behind the molding. Apply caulk to the back of the strip at each stud and stick it down tightly at each one. Push the wallboard strip along the entire length to force it flush with the wall surface. Caulk along the seam between the two to seal out air drafts and then reinstall the baseboard to cover it. Carefully nail the baseboard just above and/or below the metal shield at each stud. Caulk the baseboard to the wallboard, fill the nail holes with putty, and touch up the wall and molding paint.
 Finding an Electrical Source
 Calculating Circuit Load
 Splicing Wires With a Pigtail