Pest Proof Garden Fence Design
by: Dale Cox
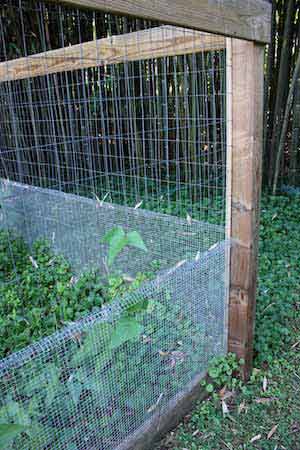
Building fencing to successfully protect a vegetable garden from pest can be difficult. Many critters who share our neighborhoods can be very clever about getting around the barriers we try to put between them and vulnerable vegetable plants.
Through many attempts at keeping groundhogs, rabbits, deer, and other wild neighbors out or our garden, we have finally found a solution that works. After 5 growing seasons without a single vegetable casualty, we are confident the combination of wood and wire in this fence design will guarantee your success too.
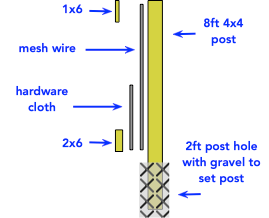
This six-foot high fence design employs 5 components that come together for an impenetrable barrier to destructive garden pests. At the base is a 2x6 set on edge and buried a couple inches into the ground all around the perimeter of the garden space. Four-by-four post are used to support the fencing sections which are made up of two types of mesh wiring and a 1x6 board along the top to stabilize it between the posts.
Planning the Fence
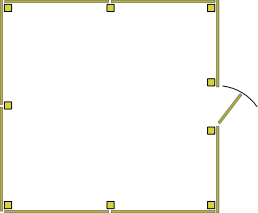
Start by laying out the space you intend to use for your vegetables. Plan for a gateway about 4ft wide at a convenient point in the layout. Calculate the number of 2x6's you will need to go all the way around the perimeter including the space for the gate. You'll have to step over this board to come and go from the garden. If you leave the gate space without this base, smaller critters will be able to squeeze under it and get to your veggies.
Use a nontoxic wood such as cedar or a composite material for this bottom perimeter board and the posts. Don't use pressure treated lumber, toxins can leach from the wood into the soil and then be absorbed by the vegetables you plan to eat.
Determine the length of each section of fence you will need and calculate the number of posts required. You can make the fence sections as long as you want provided you can find a top board to stretch the distance and still have space to nail it to the posts on each end. Use 8ft posts and dig the holes to 26 inches. Set the posts so they are plumb and use gravel to fill in the hole around them. Also put a 2" layer of gravel in the bottom of the hole to allow for drainage. Don't use dirt to backfill unless you're using a composite material, wood posts will rot over time if you pack dirt around them.
Joining the Perimeter Boards
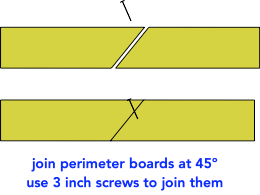
Begin constructing the fence setting all the 2x6 barrier boards around the perimeter so they are on the outside of the posts. Dig a small trench a few inches deep, place the boards on their edges in the trench, and then push dirt up against both sides. If you need to join boards along the straight runs, cut them at 45º where they meet and use 3 inch deck screws to hold them together. Butt the ends together at the corners and use screws to fasten them to each other. Don't fasten them at the posts until the wire has been installed.
Building the Fence
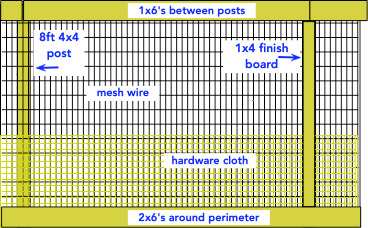
Use 5 foot mesh wire fencing combined with two foot hardware cloth to enclose the garden area. The smaller mesh goes around the bottom to block juvenile groundhogs and rabbits that can squeeze through the openings in the fencing wire. Even though these guys are small, they can do as much damage as their parents if they get into a vegetable garden.
Install the 5 foot wire around the outside of the posts so the bottom inch or so fits between the 2x6 and each post. Stretch each section tight and fasten the wire with a staple at top and bottom to hold it in place. Install the hardware cloth around the outside of the mesh wire so it too fits between the 2x6's and the posts a bit and then fasten all the wire using staples at about every 10 inches along each post.
To finish, attach the 1x6 boards to the top, outside of each post to string them all together around the perimeter. At the bottom, fasten the 2x6 boards to the posts and then staple the wire to it every 10 inches or so around the inside perimeter. If you want a more finished look to your fence, you can also add a 1x4 board on the outside of each post to cover the wire.
Stopping Climbers and Diggers
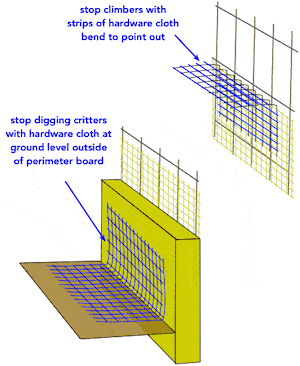
Some pests like groundhogs may sometimes try to climb the fence to get into the garden. To stop this you can attach a wire deterrent a couple feet up from the ground. Use small strips of hardware cloth about 2 inches wide and fold them at 90º along the length. Tie the strips so they point out, on the outside of the fence. You can use small strands of wire every foot or so to tie the mesh together.
If you have a problem with digging critters trying to get under the fence, you can use hardware cloth along the ground on the outside to keep them out. Cut strips about 10 inches wide and folded them at 90º lengthwise. Staple the wire on the outside of the 2x6 perimeter boards along the ground. Because these animals will only think to dig right next to the board blocking their way, they will give up when they can't get through the mesh on the ground. It only takes a narrow strip of hardware cloth to discourage digging very quickly.
Building the Gate
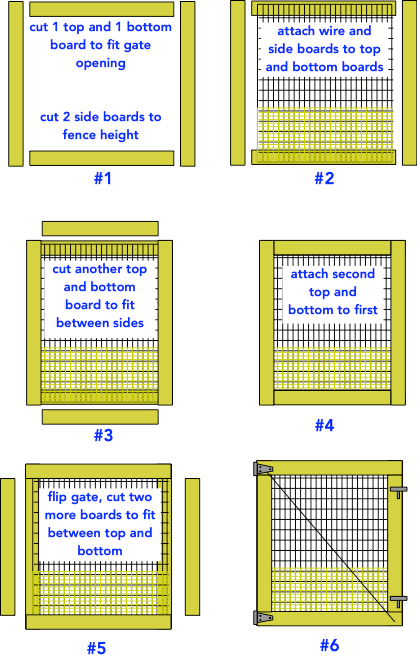
Construct the gate to fit inside the gate posts with about a half inch gap on each side. Use four 1x6's for the sides, two for the top, and two for the bottom. The fence wire is sandwiched between the double boards to construct a gate that matches the fence sections.
Following the diagram, measure your gate opening and cut a top and bottom board 1 inch shorter than this measurement. Cut two boards for the sides to the same height of the fence leaving enough gap at the bottom to allow the gate to swing when it's installed.
Cut both types of fence wiring to fit the top and bottom boards, minus a couple inches so it fits with some space around the edges. Attach the wire to the top and bottom boards so it fits squarely. Attach the side boards to the top and bottom so they squeeze the wire tight between them.
Cut 2 more boards for the top and bottom so they fit snuggly between the side boards. Attach the new boards to the first top and bottom so they squeeze the wire tightly between them.
Turn the gate over and cut 2 more boards to fit snuggly between the top and bottom boards. Attach these last two boards to finish the gate and then use T-strap hinges to hang it so it swings out. Also, install two slide bolt type gate latches to top and bottom of the gate and drill holes in the mating post to secure the opening. You could use just one latch at the top but a second at the bottom will prevent any animals from squeezing their way through.
Attach a single strand of wire at the top corner next to the hinge and stretch it diagonally to the center of the gate. Install a turnbuckle to the end and stretch another single strand of wire diagonally to the bottom corner on the opposite side of the gate. The turnbuckle will allow for adjusting the gate over time to keep it fitting squarely in the fence opening.
 Building a Garden Arbor