Trim Molding Design Ideas
by: Dale Cox
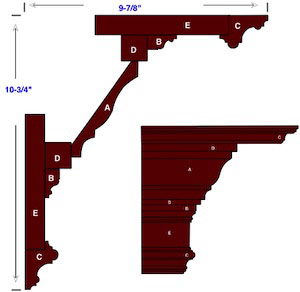
Decorative trim molding can transform the interior of a room like nothing else. For example, in a large room with high ceilings using wide moldings for crown, door casings, and baseboards can make the difference between a cold and cavernous effect upon entering and a warm, cozy feeling.
Including lots of decorative trim was once the norm for home builders to make these and other rooms more inviting and interesting. Unfortunately, this practice has gone by the wayside with the cost oriented approach to home building today.
The good news is it's easy to retrofit the moldings that were omitted by the builder or create original designs of your own by stacking finish lumber and commonly available trim profiles. This page contains some ideas for building these designs and some techniques and pointers for installing them yourself.
Designing a Stacked Trim Profile
The possibilities for trim molding designs are only limited by your imagination and the available stock of profiles at your local lumberyard. While some designs may seem complex, most are made up of just two or 3 pieces with the finished product appearing quite elaborate. To create a stacked design of your own, first decide how wide it should be. This is usually determined by the size of a room and the height of the ceiling, more about that here. Start your design with a backer board, both as a physical anchor and an inspiration for the rest of the profile. The backer can be a one-piece board like the milled baseboard and casing samples here, or it can be a 1by plank.
Next, choose some shapes that will compliment any existing preformed profile on the backer board and the other features of the room. In general, you will want to combine a few basic shapes to create an appealing effect that avoids getting too busy and distracting from the rest of the room. First consider how the profile will transitions to the wall surface. If the backer board has a shape cut along the edge it can serve this purpose, otherwise, consider using a rake or stop bead to make the transition.
Now consider the features you want to use to decorate the middle of the profile. A piece of half-round or panel bead can be a good choice here. Choose these shapes to decorate the broad surface of the backer board or help to transition to other components in the design. For small rooms keep the design simple and for larger rooms use as much decoration as you are comfortable with. Below are some examples of stacked molding designs for the whole room and links to more designs both elaborate and simple.
Stacked Crown Molding Design
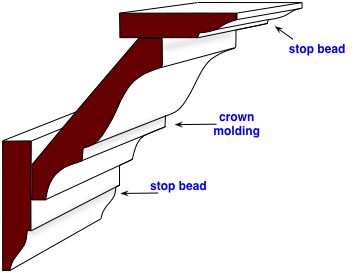
In this example a standard crown profile is embellished with stop bead on top and bottom. The stop bead transitions to the flat surfaces of the wall and ceiling while acting as the backer board for the design. Larger pieces like one-piece baseboard or casing would also work as the backer board here.
This is a very simple design but the finished effect is dramatic, especially when painted white against a darker wall color. This same basic design can be used to build the crown-molding-lighting project at this link.
To build this profile, first install the stop bead on the wall and ceiling, and then install the crown using the surface of the wall bead as the reference point for measuring and cutting. See a step-by-step of this type of installation here and more custom crown designs here.
Door and Window Casings
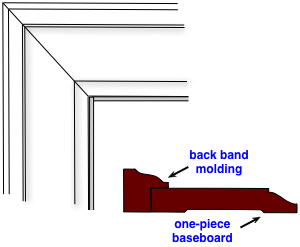
Many door and window casing styles, from Victorian to Craftsman, can be recreated using commonly available molding profiles. In this design, a piece of back band is wrapped to the edge of one-piece casing to make the transition to the wall. This technique works with one-piece baseboard profiles as well. Install this casing using 45° miters at the top corners, and either cut the bottom square at the floor, or use a plinth block to mate with the baseboard. You can combine the back band and the wider board with glue and nails first and then cut them at the same time, or cut the pieces and install them separately. Find more ideas for door and window casings here.
Chair Rails
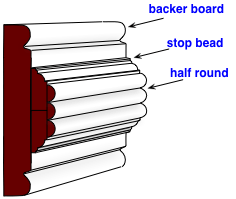
Stacked chair rail designs can be built to accommodate any wall trim need, from basic protection against furniture damage, to display shelves and cap molding for wainscot and tile.
The chair rail pictured here is built using a pre-cut backer board with stop bead and half-round decorating the middle. To install it, first nail the backer board to the wall framing along the center. Then install two pieces of stop bead so they cover the nail holes in the backer board. Lastly, install the half-round over the seam between the two pieces of stop bead using wood glue and finishing nails. See some other custom chair rails here.
Baseboards
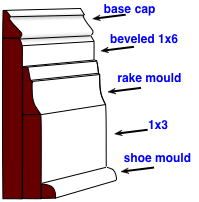
Because baseboards are at floor level it doesn't make much sense to decorate them with a lot of ornate profiles. In most cases they are simply flat boards with a decorative edge on top, and a bead of quarter round at the floor. But if you need to match existing trim molding, or you want to create a more interesting baseboard profile yourself, it's easy to do using 1by boards of various widths and some of the elaborate base caps and beads at this link.
The baseboard pictured here is built using two different size 1by planks, one stacked on top of the other. The wider board has a bevel along the top but it could also just be cut square. A piece of base cap or rake mould can then be stacked on top of each 1by and a shoe mould run along the floor. Find more stacked baseboard designs here.
Wall Shelf
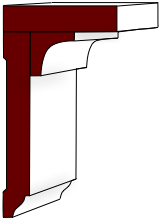
The wall shelf design here is a basic one that's very common and can be used in many applications. The profile consists of a cove bead, a one-piece baseboard molding used as a backer board, and a 1by piece for the top, or shelf. This configuration can be used as a chair rail, a plate shelf or a cap for wainscoting.
Techniques for Building These Designs
To build a custom molding profile, start with a design in mind and gather all the parts you'll need. Install the pieces using miter joints on all the outside corners and mitered, or coped joints on the inside corners.
Begin the installation by nailing the larger, backer boards to the wall and ceiling framing. This will provide a stable foundation for the remaining parts of the profile and, in many cases, the top pieces will hide the nail holes and sometimes the inside corner joints on the backer boards.
After all the parts of the stacked profile have been assembled, putty the nail holes, caulk the seams between each piece and along the corner joints, prime, and paint the finish. If you are doing a natural wood finish, caulk will distract from the effect so make sure to cut precise joints for a tight fit with no gaps and fill the nail holes with a wood filler or colored putty.
Modifying Stock Profiles
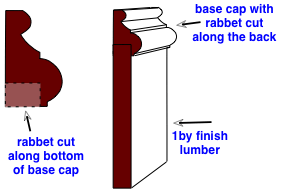
Joining the pieces for stacked molding is usually done by butting them together and then caulking to hide the seams. This is the fastest and easiest way to build a profile but it may not be the best way to get a smooth, integrated finish. When the individual pieces won't come together the way you want, you can use notching to join them for a more seamless union. As in the example here, a rabbet can be cut along the bottom of a large piece of base cap, it will then lock over the 1x6 to blend the parts, making them look like a one-piece baseboard.
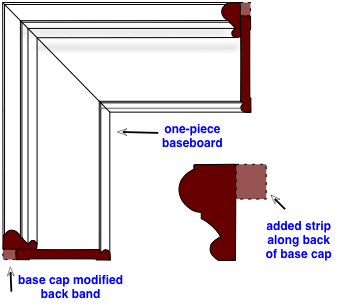
Another technique to modify an existing molding profile is to add a block or strip to one edge. For example, here a back band molding is created by adding a square strip to a piece of base cap. The seam between the two pieces is sanded with an 80 grit sanding block followed by 120 grit to make the union invisible when painted.
This improvised back band is used in stacked with a one-piece baseboard to create a custom door casing. Other small molding pieces would work as well for this such as rake, panel or stop bead.
Cutting Custom Moldings
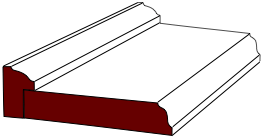
If you can't find a profile or configuration you want for your design and you have some basic woodworking skills, you can hand-cut the pieces you want from smooth, finished lumber. In this example a high-speed router is used to cut the desired profiles for a custom door casing. Router bits are available in many common profiles and sizes, as well as some more exotic shapes using stacked cutters. If you have a router, you can make just about any molding you need using one or two of these bits.
If you really want to mill your own moldings, a router is a start but a wood shaper is a much more versatile tool. Shaper cutters, also called knives, come in a wide variety of shapes and sizes, some of these can be assembled in different combinations to build a unique profile that can be cut into any size molding you want. With this tool you could recreate any molding you need, or cut any custom design you can dream up.
Steps to Make This Door Casing
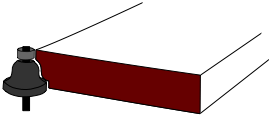
1- cut a profile along one edge of a 1x4 or wider 1by plank to make a one-piece casing.
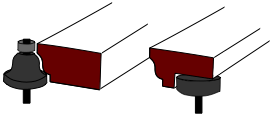
2- cut a profile along the edge of another 1by board and use it to cut the back band for the edge. You can rip about 1¼ strip from the length using a circular saw or table saw.
3- turn the strip over and cut a rabbet along the backside to form the joining edge. Finish by gluing and clamping the two pieces together. When the glue dries, the trim can be sanded, cut, and installed.
 Build a Wide Crown Cornice
 Building Stacked Moldings