How to Build a Garden Arbor
by: Dale Cox
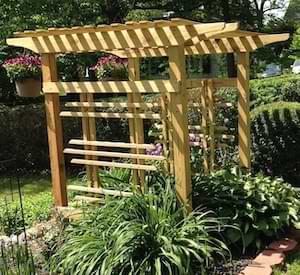
A wood arbor can add a handsome focal point to any backyard or garden space. The work involved is basically the same whether you choose to build a simple design or a more elaborate one like the arbor pictured here.
Building an arbor like this requires setting 4 corner posts, attaching 6" wide headers to each side, joining them with batten boards, and building a lattice design on the sides to add interest to the project and provide support for climbing plants. The posts in this design are 4 x 4 pressure treated pine and the headers, top, and lattice are made from smaller pieces of the same type of wood.
Arbor Construction Details
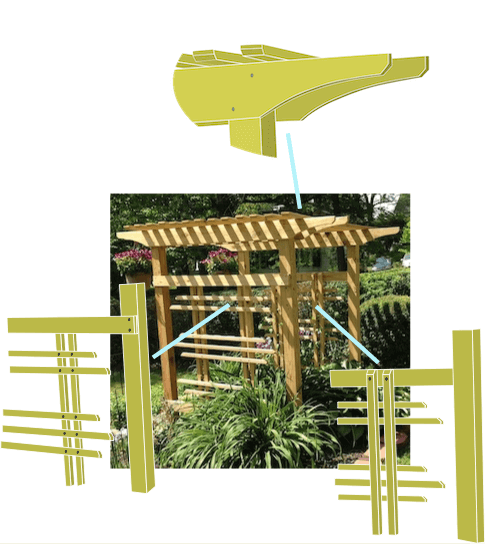
The headers are made using 5/4 x 6's (five quarter by six inch boards) with a decorative design cut on the ends to add some flare to the structure. The top batten boards are cut by ripping these same 5/4 x 6's to form two 5/4 x 2-5/8's. The two resulting 2-5/8" pieces are smoothed along the cut edges with sandpaper to produce the finished widths for the battens. The extra thickness of five-quarters inch gives these smaller pieces stability and helps prevent warping and twisting as the wood dries.
The side lattice is built using 2 x 4's for the top and bottom rails and several 2 x 2 pieces, which are normally used for deck railing, make up the decorative design. Precut, pressure treated lumber suitable for all these parts, except the battens, can be found at any home store or lumberyard. Pressure treated 1 x 3's, stock sizes at the lumberyard, can be substituted for the ripped batten boards but they will be more prone to warping and twisting than the thicker 5/4 pieces recommended here.
#1 - Layout the Posts
To construct the arbor in this design, the side posts are set 5 feet apart and the two side structures are also spaced at 5 feet. The posts top out at 6.5 feet from the ground, making the batten boards high enough to walk under and provide a suitable height for hanging plant baskets, etc. You can vary the measurements from this design to suit yourself if needed. However, keep in mind the postholes will need to be at least 1.5 feet deep to keep the posts firmly set in the ground, meaning the height is only slightly variable for the 8ft posts used here.
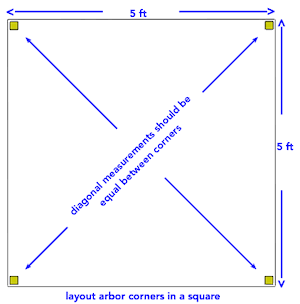
Start the layout by staking the location for each post. Decide how you want the arbor opening oriented and set your stakes for the two front posts first. Tie a string between these front stakes and use a framing square to set the location for the two rear post.
Measure straight back along the square and set the rear stakes at 5 feet. Tie string between them and then between each front and rear stake forming a line around the arbor perimeter. Check that you have the stakes place properly by measuring diagonally from corner to corner. Both measurements should be equal. If they aren't, adjust your stake placement until you have a perfect square outlining the arbor sides.
Dig each posthole removing the stakes one at a time. If the ground isn't level where you are building this arbor, adjust the depth of the holes as needed so all the posts are at the same height when you're done. Place each post into its hole and before setting them plumb, use the framing square and measure between them again to ensure the placement is right.
#2 - Install the Headers
The headers on this arbor are cut with a decorative profile on the ends. If you look around you can find several options for this profile but the one here is a bit unique and easy to cut with a jigsaw and miter saw combination. A miter saw will also come in handy for cutting the decorative 45° bevels on the ends of the lattice pieces and batten boards.
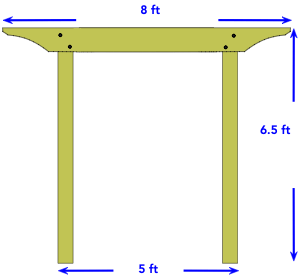
This arbor design uses double headers on each side but you can use just one attached to the outside of each post if you prefer. If you want double headers, attach one to each side of the post and cut the outer pieces slightly shorter than the inner ones to add a bit of flare to the overall appearance.
The headers should overhang the posts about a foot or so at front and back. The longest headers here are 8 feet which is about the minimum for visual balance with posts spaced at 5 feet. The header length isn't set in stone, make yours as long as you like but keep in mind they should be long enough to be visually appealing when attached to the posts and also accommodate the dimensions of the decorative profile cut into the ends.
When you have the headers cut, attach them to the tops of the posts using decking screws. Be sure to set all headers so they are level with each other and the tops of the posts are hidden. To prevent the wood from warping as it dries, attach the headers using two screws at each post, one top and one bottom. For a more refined finish, pre-drill the screw holes using a 3/8th inch forstner bit and cap them with wood plugs when you're done.
#3 - Install the Batten Boards
The top of this arbor consists of 5/4 thick batten boards spanning the headers to tie the two sides together with about 8 inches overhang on each side. A decorative 45° bevel is cut in both ends of the battens using a miter saw and the boards are spaced regularly from front to back of the arbor.
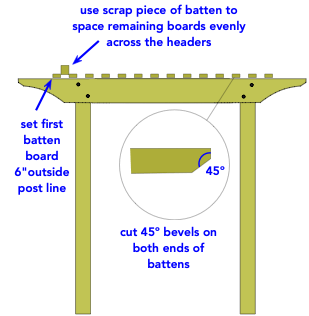
As with the headers, the length on these boards is variable. Our battens overhang the sides by about 8 inches making them 6ft 7in long. To vary this length choose one that is esthetically pleasing and if you plan to hang flower baskets along the sides, be sure the battens are long enough to accommodate that.
To make the battens we use 5/4 x 6" pressure treated decking boards. These extra thick boards help to keep the wood straight as it dries. You can also use pressure treated 1 x 3's available precut from home stores but the thinner wood will be prone to twisting and warping more easily.
To use 5/4 x 6's, rip the boards down the middle to form two pieces, each 2-5/8 inches wide. The safest way to rip boards like this is to use a table saw. If you don't have a table saw, you can still rip boards using a circular saw with a fence attachment although it can be difficult and a bit dangerous this way.
Sand the rough edges smooth and "break" the corners by rounding them over with 80 grit sandpaper so they match the finished edge on the uncut side. Trim the boards to the batten lengths and use a miter saw to cut 45 degree bevels in both ends. Attach the battens across the tops of the headers with one screw in each end. Set the first batten so it sits just outside the post line, ours is 6 inches, and then use a couple pieces of scrap 2-5/8" board to space each new batten evenly as you install the rest. For visual balance, make sure you layout the battens so when you reach the other end the last one will be about the same distance outside the post line as the starter board.
#4 - Build and Install the Lattice
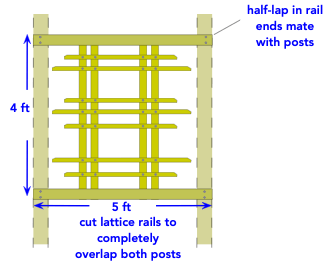
The lattice work on this arbor is sized to fill most of the space between the front and rear posts and top to bottom. The rails are made using 2 x 4's with a 3-1/2 inch half-lap cut in each end to join with the 4 x 4 posts. This allows the lattice structure to fall more evenly within the 3-1/2 post space and not protrude severely on the outside. This gives the design a more refined appearance than it would have if the full thickness of the 2 x 4's were attached to the outsides of the posts.
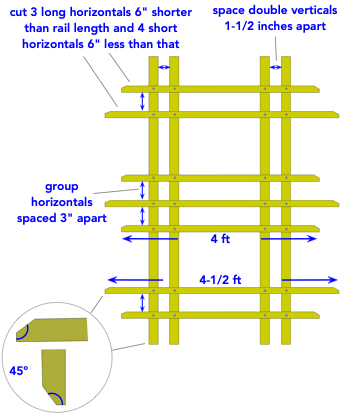
The decorative lattice design is made using 2 x 2 boards with a 45° bevel cut on the ends. The parts include 4 vertical supports and 7 horizontal pieces to build the lattice structure for one side of the arbor. The double vertical supports completely overlap the rails at top and bottom, are set about 12" from each end, and the pairs are spaced at 1-1/2 inches apart. The horizontal pieces are staggered in length by 6 inches with one pair at the top and one pair at the bottom. A set of 3 horizontal pieces are grouped at the center of the design.
Construct the lattice starting with one long horizontal piece set at the mid-point of the 4 vertical supports. Space the two shorter center horizontals about 3 inches away, above and below the center piece. Set the top and bottom horizontal pairs about 12 inches from this group with the longer horizontals closest to the center.
Center this assembly on the inside of the rails so the ends of the vertical supports are flush with the outer edges of the 2 x 4's. Fasten the lattice using one screw in both ends of all four vertical supports. Finally, attach the whole lattice structure to the posts using 2 screws on each half-lap joint. You can place the lattice dead center between the ground and header or allow more space at the top for visual effect.