How to Build a Folding Sawhorse
by: Dale Cox
Sawhorses are handy for making a quick, sturdy platform to do any number of things from sawing, to painting, to assembling projects. You can even make an instant table in a pinch with a couple of sawhorses and a door or plywood sheet. No doubt about it, sawhorses are great to have around but they can also be difficult to store due to their awkward shape. They take up a lot of space when not in use.
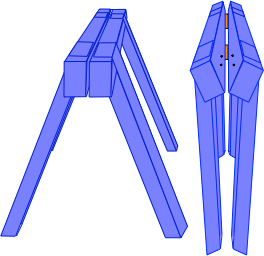
To overcome this little problem you can use the plans on this page to build a sturdy sawhorse that folds up so it can hang on a wall or slip into a closet when not in use.
This sawhorse can be constructed in an afternoon using just two 2x4's and 2 door hinges. The design includes two spines, one for each side of the sawhorse. Two legs are attached to each spine using a half-lap joint and then the two halves are joined together with heavy duty door hinges.
In the folded position this sawhorse measures just 7" x 22" taking up minimal wall space when hung from hooks or stashed in a closet or other small space. If you have two of these, and what good is just one, they also stack easily when folded so you can fit two in a closet almost as easily as one.
Sawhorse Cut List
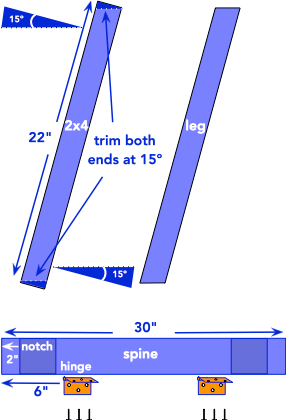
The cut list for one sawhorse includes:
- -four 2x4 legs @ 22" long
- -two 2x4 spines @ 30" long
- -2 hinges
Start by cutting all the legs to 22 inches long. Then mark each end and trim it off at 15° so the angles oppose each other at each end. This will produce a leg that sits flat on the floor and forms a level surface with the spine at the top when the sawhorse is in the opened position.
Next cut all the spines at 30 inches long. You can make them longer if you want a larger sawhorse but keep in mind the space you'll need for storage.
Notch one side of each spine to fit a 2x4 leg on each end. Set the legs back from the ends of the spine by a couple inches. We use 2" here but that too is variable to suit your needs, just be sure to provide enough room to install the hinges underneath.
#1 - Notch the Spines
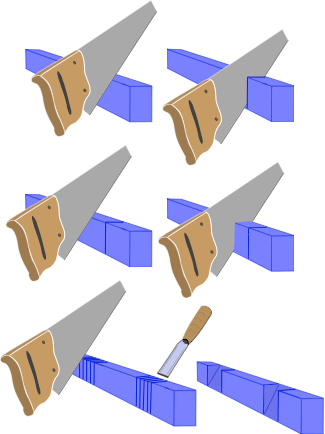
To notch the spines use a scrap of 2x4 to layout the leg dimensions squarely across the spine and draw a pencil line for each side. Cut the notches using a handsaw to score from the top, inside corner to the bottom, outside corner.
Score the two pencil marks first and then cut several kerfs between them about every 1/2 inch or so. Use a sharp chisel to remove the excess wood from the notch and fit the 2x4 scrap into it to be sure you've got a good fit.
#2 - Pre-Drill the Hinge Screw Holes
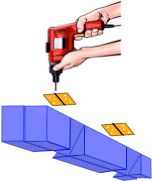
Turn the spines over so the bottom faces up and clamp the two together side by side. Mark about 6 inches from each end and set a hinge on the mark so it lays flat and square and the pin aligns with the union of the two spines. Mark and drill a pilot hole for each hole in the hinges and then set them aside.
#3 - Assemble the Sawhorse Halves
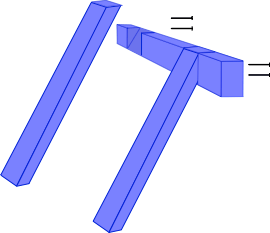
Flip the spines over and unclamp them. One at time, lay a leg into a notch so the end is flush with the top of the spine and fasten it in place using two 2-1/2 deck screws. Drive the screws from the inside of the spine and into the leg.
#4 - Join the Halves
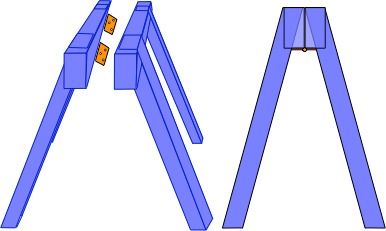
With all the legs attached, take two sawhorse halves and join them with the hinges using the pre-drilled holes you made earlier. That's it.
The weight of a load laid across the sawhorses will keep them stationary in the opened position. You could also clamp the spines together from underneath if you're worried they may be knocked over during use.
When you're ready to stow them away, they can be folded for storage by simply lifting from under the spine and letting the legs fall together. A couple of bike hooks or just two long, 20d nails work nicely to hang them on a shop wall.
 Building a Backyard Arbor