Baseboard Molding Ideas
by: Dale Cox
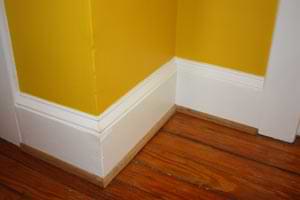
This page contains some ideas for building combination baseboards using 1by finish lumber and commonly available molding profiles. These are constructed by stacking 3 or more different trim pieces to create designs that mimic historic profiles and invent some new ones.
Baseboards are not a focal point of a room and usually don't incorporate elaborate details in the design but some creativity can come into play in larger rooms as with the last example on this page. When designing new moldings like this, be sure to take the size of the room into account and use a trim width that matches and compliments it, check this link for more about that.
Traditional Combination Baseboard
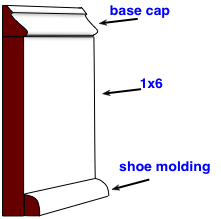
This is a ubiquitous design found in a variety of different home styles. It is made up of 3 parts: the base cap, a 1x6, and quarter-round shoe mould. This mid-sized base can be used in average rooms with 8 to 9 foot ceilings or a wider 1by board can be used for larger rooms. To vary this design other small profiles can be used in place of this simple base cap, the shoe mould or both.
To install this trim the 1by is nailed to the studs along the floor first using butt joints at inside corners and mitered outside corners. The base cap goes on next and then the shoe using miters on the outside corners and miters or coped joints on the inside corners. Because these strip are so small, an inside miter will work fine in most cases.
5-Piece Baseboard Design
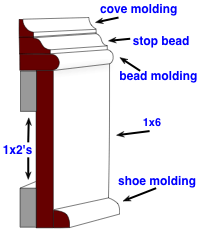
This baseboard is built using 1by lumber and 4 small molding profiles. The blocks along the back push this face out to about 1½ inches, making it suitable for use with deep, Victorian style door casings.
The base cap is created by stacking 3 separate moldings: a cove, stop bead, and small bullnose profile. The shoe is a standard quarter-round but other small strips can also be used along the bottom to vary the look. A 1x6 is used here but wider boards can be used instead.
To install this baseboard, 1x2 furring strips are nailed to the wall framing first and the 1by is nailed along the front. A bullnose bead is stacked on top of the base and butt against the wall. The stop bead and cove are then each stacked on top of that and butted against the wall. All these small pieces should be installed around the whole room before moving on to the next one. As with the installation above, these small strips can be joined with miters on the inside corners.
Stacked 1by Baseboard Design
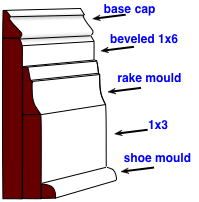
This is a stacked design, also suitable for use with deep door casings. The backer board is a 1x6 with a bevel cut along the top edge but a simple square cut will work also. A second, smaller 1by board is stacked along the face of the backer and it is capped with a piece of rake mould. The top and bottom are trimmed with the same ogee base cap and shoe molding used in the traditional design above but there are lots of choices for these pieces that can add some pop to the design for a more elaborate theme.
Victorian Style Baseboard
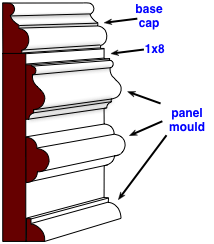
This design is suitable for large rooms with high ceilings where elaborate trim won't clutter the decor. This example is typical of a Victorian theme with very deep and wide door casings, chair rails, and crown moldings. This particular design includes a lot of curves and stops that can become overwhelming in a smaller room and should be avoided in such cases.
To build this profile a 1x8 serves as a backer board but a wider 1by would also work. Two different panel molding profiles decorate the face of the 1by and another serves as the shoe mould. The top is finished with a beaded base cap.
 Chair Rail Molding Designs
 Building Stacked Moldings