Wiring Diagrams for Bathroom Exhaust Fans
by: Dale Cox
Check permit requirements before beginning electrical work.
How to read these diagrams.
This page contains wiring diagrams for bathroom exhaust fan circuits including arrangements for a single fan switch, a fan timer switch, a GFCI Combo switch and exhaust fan, a GFCI receptacle and timer in the same box, a light switch and fan timer, and a GFCI combo switch and timer in the same box. Follow the description in the first diagram for connecting the wires at the fan as it will always be the same no matter which controller your are using. The wiring arrangement at the switch box is described under each diagram.
Diagram to Wire a Switch and Bathroom Exhaust Fan

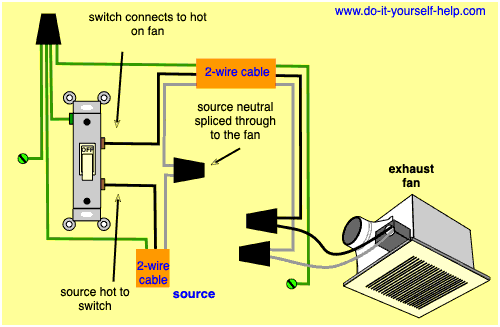
These exhaust fans usually come with a small electrical connection box welded to the side of the housing. There will be a cover on the connection box that fastens with a small screw. Open it, pop the plug out of one of the wire holes and thread a wire clamp into it. Strip about 6 inches of cable sheathing off the wires at the fan end and remove about 3/4 inch insulation from the black and white wires. Put the wires through the clamp and pull them into the box leaving an inch of sheathing showing. Tighten the clamp snugly around the cable sheathing but don't pinch it. In the box, splice the black cable wire to the black fan wire and the white to the white using wire nuts. Connect the ground wire to the grounding terminal in the connection box and the ground wire from the fan, if there is one.
At the switch box, connect the source hot wire to one terminal. Connect the other switch terminal to the black wire running to the fan. Splice the source neutral to the white wire running to the fan. Splice the source ground wire to the ground wire running to the fan and a pigtail wire connected to the ground terminal on the switch and/or box.
Diagram to Wire a Timer-Controlled Exhaust Fan

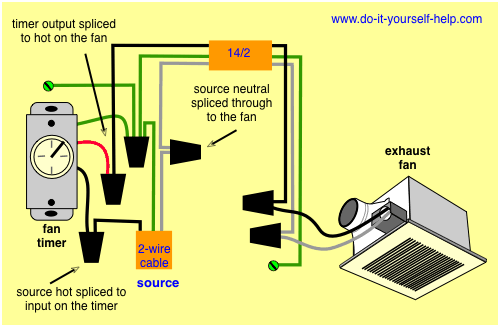
Here the exhaust fan is controlled by a timer instead of a switch. There should be two hot wires, black and red or both the same color, and a green ground wire coming out of the timer casing, splice one of the hot wires to the hot source. Splice the second to the black cable wire running to the fan. The hot wires on the timer may be labeled to indicate which is connected to the fan and which to the hot source. If so, connect them accordingly. Splice the source neutral to the white wire running to the fan. At the fan splice the wires, matching white to white and black to black and connect the ground wire to the grounding terminal.
Wiring for a GFCI Combo Switch and Bathroom Exhaust Fan

In this diagram a GFCI combo is used to control the exhaust fan providing both a switch and GFCI outlet in one device. The source hot is spliced to one of the builtin switch wires and a pigtail to the hot LINE terminal on the GFCI receptacle. The other switch wire is spliced to the black wire running to the fan. The source neutral is spliced to the white wire running to the fan and a pigtail to the GFCI LINE neutral terminal. Wiring at the fan is as described above.
Diagram for a Fan Timer and GFCI in the Same Box

In this diagram a fan timer and GFCI receptacle are wired in the same outlet box. One timer wire and a pigtail to the hot LINE terminal on the GFCI are spliced to the source hot wire. The second timer wire is spliced to the black wire running to the fan. The source neutral is spliced to the white wire running to the exhaust fan and a pigtail to the neutral LINE terminal on the GFCI. Wiring at the fan is the same as described above.
Wiring Diagram for a Fan Timer and Light Switch in the Same Box

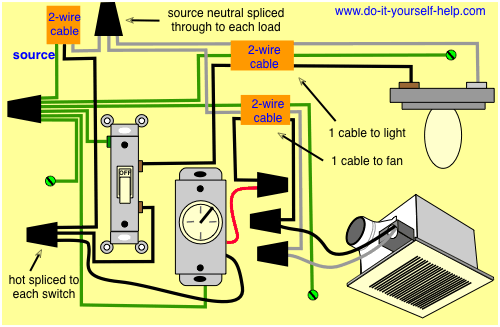
In this wiring arrangement a light fixture is controlled with a single-pole switch and the exhaust fan is controlled with a timer. The hot source is spliced to each controlling device and the output of the controllers are connected to black wires running to the fan and light. The hot wires on the timer may be labeled to indicate which is connected to the fan and which to the hot source. If so, connect them accordingly. The source neutral is spliced to each white wire running to the fan and light. As with all these wiring arrangements all ground wires are tied together at each location.
Wiring for a Fan Timer and GFCI Combo in the Same Box

In this diagram a fan timer and GFCI Combo device are in the same outlet box. The builtin switch on the GFCI is used to control a light fixture. The hot source in this circuit is spliced with a pigtail to the hot terminal on the GFCI receptacle and one wire from each switch. The source neutral is spliced to the neutral wires running to the light and the exhaust fan and to a pigtail connected to the neutral receptacle terminal on the GFCI. The second switch wire on the GFCI is spliced to the hot wire running to the light fixture. The second wire on the timer is wired to the hot wire running to the fan. The fan wiring is the same as described above.
 Ceiling Fan Wiring Diagrams
 Wiring for Combo Switches
 Wiring a GFCI Combo Switch
 Light Switch Wiring
 3 Way Switch Wiring