How to Sand Drywall Without Dust
by: Dale Cox

When it comes to sanding dry joint compound, you're going to have a lot of dust. And because it's so light, the dust will float through the air and settle onto every exposed surface. This can be the most difficult part of doing wall repairs or hanging new drywall for some people.
The good news is there is a way to greatly reduce the dust produced from sanding joint compound. The bad news is, you may need to buy a new tool or two to do it. If you already have a good shop vac, you're halfway there. If not, you may be able to rent one, or you can use an old house vacuum, if you don't mind getting it dirty or possibly damaging the motor. Check here for a video demonstrating how to use a shop vac to sand joint compound.

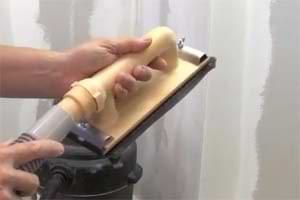
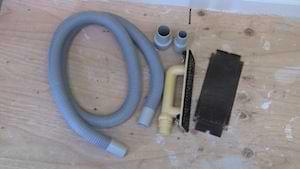
With your vacuum ready, the second part of this system is an attachment that allows the vacuum to draw dust away as you work, making the job much less taxing and dirty. There are several systems like this on the market and most consist of a block, a sanding screen, a hose, and a couple of adapters. The plastic block has holes feeding an outlet tube and a rubber base that accepts the sanding screen. The outlet tube has an adjustable ring to regulate pressure and fits into an included six foot hose. The hose from the kit connects with your vacuum cleaner hose to provide about 12 feet of reach. The whole thing is very light so using it is as easy or easier than sanding by hand.
While this setup is sufficient for most jobs around the house, if you're installing all new drywall on high walls and ceilings or doing extensive plaster repairs, you can also get a pole attachment that can make these big jobs easier.
Using the Sander
Before beginning be sure to let the joint compound dry completely. Load the screen onto the block and tighten it so it lays centered and flat over the holes. Fold the edges of the screen up around the sides of the block to form a square for doing corners. Hook the hoses together and attach them to the vacuum cleaner. Turn the vacuum on and begin working at a corner or the edge of a repair before moving into the center. Apply only enough pressure to begin removing the surface of the joint compound but not enough to dig in and gouge it with the screen. Go slowly enough to allow the vacuum to do its job.
If the block resists moving, turn the ring on the outlet port to adjust pressure until you can move it back and forth easily. Go over the surface lightly, in arcing strokes to remove enough compound to level the surface and remove ridges and scratches. Use the edge of the block with the folded screen to get into wall corners and along ceilings. Work around the edges of the joint compound lightly, paying close attention to blending the surrounding wall surface and the dry mud together in a smooth transition.
Use a Good Vacuum Filter
Because joint compound dust is very fine, you will need a good filter in the vacuum cleaner to contain it. This means your shop vac should have a pleated filter, not a foam or paper filter. If you don't use a good filter, the dust will surely escape into the air and likely ruin the vacuum cleaner motor in the process. If you have a lot of sanding to do, you will have to clean the filter as it becomes clogged with dust. If the vacuum begins to sound strained, check the filter and clean it if necessary. If you have a big job to do, you should have a replacement filter so you don't have to stop in the middle to clean the vacuum.
A water filter is another part that can be added to the vac sander to catch most of the dust before it reaches the vacuum filter. This is a large bucket with a sealed top and filled partway with water. The top has two ports to attach the vacuum hoses, one for input and one for output. As the dust is drawn up it drops into the water as it passes through the bucket, leaving mostly clean air to continue on to the vacuum cleaner. These systems can eliminate the dirty filter problem and keep virtually all the dust out of the air but it will limit your movement.
Cleaning a Dusty Shop Vac
To clean a dust filled shop vac filter, take the whole thing outside if possible as this is a dirty job. Remove the filter and immediately place it inside a large plastic trash bag. Close the top of the bag around your arm while still holding on to the filter to contain the dust. Shake the filter inside the bag and lightly tap it against a firm surface to loosen the dust and knock it free. Be careful not to tap to hared to avoid crushing the pleats or breaking the rubber filter frame.
With the bulk of the dust removed, take the filter out of the bag and place into a new one. Close the first bag to hold the dust. Work with the filter in the new bag and use a screwdriver and hand broom or paint brush to loosen and remove clinging dust from between the pleats. Remove the filter from the bag and brush the last of the dust away with a stiff brush. If you have a blower or compressed air, you can use it to remove even more dust if you're working outside. You can wash the filter spraying it with a garden hose and leave it to dry overnight. If that's not an option, you can just shake off the dust and reinstall it on the shop vac.
Hand Sanding Joint Compound

Before beginning make sure all joint compound is completely dry, you'll ruin the paper and the repair if you sand while it's still wet. Ready-mixed can take 12 hours or more to dry completely. Setting-type will dry much quicker, depending on the setting rate and the depth of the repair it can dry in 10 minutes to about an hour.
Prepare the sandpaper by tearing a 8x11 inch sheet in half. You can rip it after folding it in half lengthwise and crimping the seam to weaken the backing paper. Open it back up and then tear it in half along the fold.
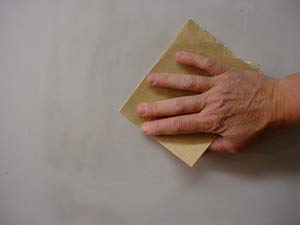
Fold one of the pieces over and hold it with the fold away from you. Fanned out your fingers to apply even pressure and use a light touch. Start on one side of a repair and stroke in wide arcs across the whole area to gradually smooth out imperfections.
Be careful working around the edges on wall repair patches, especially when dealing with drywall. You can dig in and ruin the surrounding surface while trying to smooth out the rough edges. Use light pressure to feather a smooth transition between the two surfaces. To do wall and ceiling corners, fold the paper in half again, open it back up to 90° and use it to sand both sides of the corner at the same time.
Using the right sandpaper for joint compound can make the difference between a smooth finished repair and one with scratches and tool marks. Joint compound is a relatively soft material and easily scratched. It doesn't take much abrasive to remove a lot of it, very quickly. The best general grade of sandpaper for this job is 120 grit, especially if you're sanding setting compound. For ready-mixed, the better choice is 220 grit because the compound is so much softer.
You can buy a small package of 10 sheets of sandpaper in varying grits at any home or paint store and these can be a good choice if you have a wall repairs and trim molding to work on. But if you are only dealing with joint compound, you'll only be able to use the medium grit from a pack like this. In fact, for most projects around the house 120 grit is a good choice, making it worth getting a pack with just this grit instead of the multi-packs.
No matter which grit you choose, you should keep the unused paper in the cardboard container it comes in to help keep it clean and dry. Also, be sure to keep the package in a dry place like a wood drawer and avoid storing it in damp places like a basement where it will absorb moisture and be ruined over time.
Wet Sanding Joint Compound
You can eliminate virtually all the dust from sanding drywall mud using a wet sponge to smooth out the finish. This can be tricky and takes a bit of practice to avoid ruining your repairs or joint compound floats. You need to start with a mostly smooth finish to make wet sanding work because you can't remove ridges or other bumps with a wet sponge without removing too much of the adjacent areas as well. This can create dips and thin spots in the overall surface of the repair.
To wet sand use a large cellulose drywall sponge and have a bucket of clean water to rinse it frequently as you work. Wring the sponge out so it's damp but not dripping with water and go over the dry mud in wide, light strokes. Avoid applying too much pressure and don't linger in one place too long or the mud will become rehydrated and begin to smear.
Go around the edges of the mud, starting with a newly rinsed sponge. Try to touch the edge as little as possible with the sponge, it is very easy to remove too much mud and create a ridge around the border where the wall surface meets the joint compound patch. To get a smooth transition with a sponge requires a virtually smooth transition to start with, the best that can be done with a wet sponge is to remove the surface particles without removing too much mud or leaving streaks in the finish.
Making a Sanding Block

A sanding block can come in handy for any number of jobs around the house and they're indispensable for keeping a square, flat surface when removing protrusions on wood trim or wall surfaces. A large block with coarse 80 or 50 grit can reduce the effort required to wear down a rough surface as it can remove a lot of material very quickly. For special jobs like smoothing trim molding, 2 or 3 custom cut wood blocks will make it possible to reach all the intricate details of the profile. Also, a sanding sponge can make smoothing the contours of trim molding easier and more effective. The flexible nature of the sponge makes it possible to reach all the varying surface levels of the profile with a single tool.
To make a wood sanding block for molding, cut a piece of half inch plywood about 3 inches wide and several inches long. Make a 45° cut along one edge of the board and wrap a piece of sandpaper around it. Use it to get into the corners of the profile and stroke down the trim piece with one smooth motion. Also, try a short piece of half-round to smooth out cove shapes along wood trim.
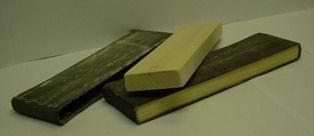
To make a good general purpose sanding block, use a belt from a handheld belt sander and slip it onto a piece of 1x3 or 1x4 board. You can make several blocks with different grits or switch belts for different jobs.
To make a quick sanding block tear a sheet of 8x11 paper in half and wrap one of the pieces around a 1x3 board about 5 inches long. Hold the paper in place with your hand as you work, or you can use a spray adhesive to stick the paper to the wood. Also, if you have some sander discs with adhesive backing, you can just stick one to a wood block.
About Abrasive Materials in Sandpaper

The term sandpaper refers to a number of different types of abrasives which can have several different types of backing materials and come in several different forms. No matter the job you have to do, you can find a specially made abrasive to help. Some of these products you can find at your local home store include: sanding belts, tape, discs, cylinders, sheets, and abrasive sponges that flex to follow the contours of decorative molding and other irregular surfaces.
There are a few different abrasives used to make sandpaper in the US: almandite, a natural mineral that is red in color, aluminum oxide which is a gray-brown color and silicon carbide which is iridescent black and the hardest of the three. Almandite is a red garnet and the abrasives made with it are sometimes called garnet paper. This type of abrasive is used on soft materials like wood but it's not hard enough to cut materials like metal. Use aluminum oxide paper for metal and other hard surfaces, use silicon carbide for metals, stones, and wet sanding projects.
Grades
Sandpaper is rated based on the size of the grains of abrasive used. Twenty-two screen sizes are used to sort the grains ranging from 12 openings per square inch to 600. The size of the grains determines the coarseness of the sandpaper. These ratings are not always used by the manufacturer to label their products for sale. The terms fine, medium, and coarse will often be the only rating used to identify grit density on a package. Generally speaking, the term fine is used for abrasives from about 150 to 220 grit, medium from about 80 to 120 grit and coarse for 36 to 50 or 60 grit.
While the grit size is determined by screen size, the density of abrasive grains per square inch can vary between open and closed coat. Open coat sandpaper has about 30 to 50 percent open space with no grains of abrasive. This open space decreases the tendency of dust to collect between the grains. Closed coat paper has very little space between the grains and will clog or "load" with dust very quickly. Open coat sandpaper is plenty abrasive even with fewer grains and will last through many more uses than closed coat, so it's the best choice for diy. Fortunately, open coat is the most common type you will find at your paint supplier.
Backing Materials
Backing materials for abrasives are another consideration when choosing sandpaper. The backing used to make abrasives can be paper, cloth or fabric. Paper is available in four weights: A, C, D, and E, with A being the lightest and therefore thinnest. Some discs and floor sanding machine papers are backed with the heaviest, E grade paper. For working with wood the best paper weight to look for is a C which provides a durable backing that will last through this tough job. A weight is very thin and is well suited for silicon carbide abrasives used for wet sanding. D weight backing is used with very coarse grits of 40 and below, as well as for discs and industrial grade sanding sheets. Belts are made using a type of fabric backing that is both flexible and durable.